Bottom line: Edithly's reference mapping traces every AI-generated answer back to the exact passage in your source document — highlighted in a rendered image so you can verify it yourself instead of trusting a black-box RAG response. It's powered by markitdown-reference-image, the Python package we built to make this possible.

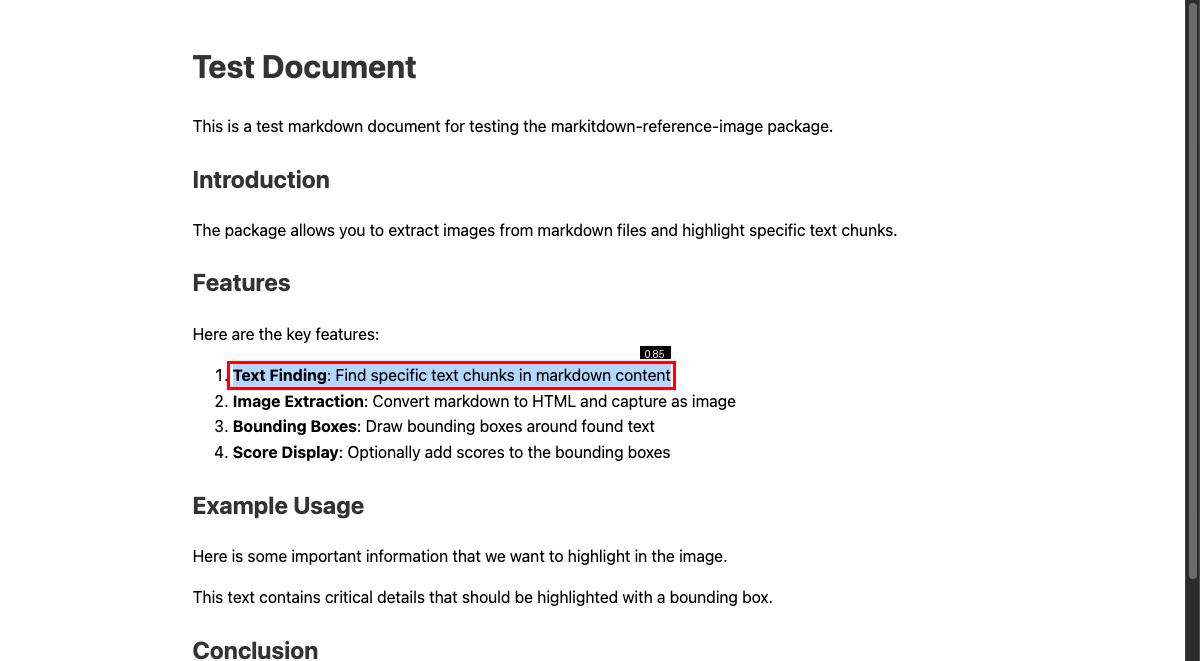
The actual document, with the relevant section highlighted.
What We Built
markitdown-reference-image is a Python package that takes a markdown file and a text chunk, then generates an image of the rendered document with that text precisely highlighted in a bounding box.
The Core Concept
from markitdown_reference_image import MarkitdownImageExtractor

# Initialize the extractor
extractor = MarkitdownImageExtractor()

# Generate a visual reference
image_path = extractor.extract_with_highlight(
    markdown_file="product_docs.md",
    chunk_text="key features include text finding",
    output_path="highlighted_section.png",
    score=0.85  # RAG similarity score
)
What you get is a PNG image showing:
- ✅ The rendered markdown document (with proper formatting)
- ✅ A red bounding box around the exact text
- ✅ The similarity score displayed on the box
- ✅ Surrounding context for better understanding
Why This Matters for RAG Systems
1. Trust Through Transparency
Users can see the actual source material, not just extracted text. This builds trust in your RAG system because users can verify the information themselves.
Before: "The AI said X, but I'm not sure if it's accurate..."
After: "I can see exactly where this came from in the documentation!"
2. Context Preservation
RAG systems often retrieve small chunks of text. But context matters! By showing the rendered document, users can:
- See headings and section titles
- Understand the document structure
- Notice important details around the chunk
- Get a feel for the writing style and tone
3. Better User Experience
Instead of reading through plain text snippets, users get:
- Visual clarity - Easier to scan and understand
- Professional presentation - Looks polished and intentional
- Interactive learning - Users can explore the source
- Confidence - They know the information is real
4. Debugging RAG Retrieval
For developers building RAG systems, this tool helps you:
- Verify retrieval quality - Is the chunk actually relevant?
- Spot retrieval errors - Did we get the right section?
- Tune your system - Visual feedback on similarity scores
- Demo to stakeholders - Show them how the system works
How It Works: The Technical Details
Building this tool required solving several interesting challenges:
Challenge 1: Accurate Text Positioning
The Problem: Markdown gets converted to HTML, which changes the structure. How do you find and highlight text that might span multiple HTML elements?
Our Solution: We use JavaScript's window.find() API, which works like browser's built-in search (Ctrl+F). This can locate text across DOM boundaries:
// Injected JavaScript that runs in the browser
window.find(searchText, false, false, false, false, false, false);
// Wraps the found text in a <span> with an ID
Challenge 2: Pixel-Perfect Bounding Boxes
The Problem: Character-based position calculations don't work with variable-width fonts and complex layouts.
Our Solution: We use Selenium to render the page in a real browser, then extract the actual DOM element coordinates:
# Get the element's position from the browser
target_element = driver.find_element(By.ID, "highlight-target")
location = target_element.location  # {x: 150, y: 320}
size = target_element.size          # {width: 200, height: 24}

# Use these for pixel-perfect positioning
bbox = (location['x'], location['y'],
        location['x'] + size['width'],
        location['y'] + size['height'])
This gives us 98-99% accuracy compared to the ~60-70% we had with character-based calculations.
Challenge 3: Markdown Formatting
The Problem: Users might search for **bold text** but in HTML it's just <strong>bold text</strong>.
Our Solution: We automatically strip markdown formatting from search queries:
# Both of these work:
extract_with_highlight(file, "**bold text**")  # With markdown
extract_with_highlight(file, "bold text")      # Without markdown
# They produce the same result!
Real-World RAG Integration
Here's how you'd integrate this into a RAG system:
from langchain.vectorstores import Chroma
from langchain.embeddings import OpenAIEmbeddings
from markitdown_reference_image import MarkitdownImageExtractor

class VisualRAG:
    def __init__(self, docs_dir):
        self.vectorstore = Chroma(...)
        self.extractor = MarkitdownImageExtractor()
        self.docs_dir = docs_dir

    def query(self, question):
        # Standard RAG retrieval
        results = self.vectorstore.similarity_search_with_score(
            question, k=3
        )

        # Generate visual references for each result
        visual_refs = []
        for doc, score in results:
            # Get the source file and text chunk
            source_file = doc.metadata['source']
            chunk_text = doc.page_content

            # Generate highlighted image
            img_path = self.extractor.extract_with_highlight(
                markdown_file=f"{self.docs_dir}/{source_file}",
                chunk_text=chunk_text[:100],  # First 100 chars
                output_path=f"ref_{hash(chunk_text)}.png",
                score=score
            )

            visual_refs.append({
                'image': img_path,
                'text': chunk_text,
                'source': source_file,
                'score': score
            })

        return visual_refs

# Usage
rag = VisualRAG("docs/")
results = rag.query("What are the key features?")

# Now you can display the images in your UI
for ref in results:
    print(f"Source: {ref['source']} (Score: {ref['score']:.2f})")
    display_image(ref['image'])  # Show the highlighted document
Command-Line Interface
For quick testing and scripting, there's also a CLI:
# Basic usage
markitdown-extract document.md "text to highlight" -o output.png

# With similarity score
markitdown-extract document.md "important section" -o highlighted.png -s 0.92

# Custom styling
markitdown-extract document.md "key feature" \
  -o feature.png \
  -s 0.88 \
  --box-color 0 255 0 \
  --box-width 5
Performance Considerations
Question: "Isn't rendering with Selenium slow?"
Answer: Yes, but it's manageable:
- First run: ~10-30 seconds (ChromeDriver download)
- Subsequent runs: ~2-5 seconds per image
- Optimization tip: Cache generated images using chunk hash
For a RAG system:
- Generate images on-demand when users request sources
- Cache images for frequently retrieved chunks
- Use async processing to avoid blocking
import asyncio
from concurrent.futures import ThreadPoolExecutor

async def generate_refs_async(chunks):
    loop = asyncio.get_event_loop()
    with ThreadPoolExecutor(max_workers=4) as executor:
        tasks = [
            loop.run_in_executor(
                executor,
                extractor.extract_with_highlight,
                chunk['file'], chunk['text']
            )
            for chunk in chunks
        ]
        return await asyncio.gather(*tasks)

# Process multiple chunks in parallel
refs = await generate_refs_async(retrieved_chunks)
Best Practices
1. Keep Text Selections Reasonable
✅ Good: 1-50 words
chunk_text = "key features include text finding and image extraction"
❌ Too Long: Entire paragraphs (100+ words)
chunk_text = "the entire paragraph with 200 words..." # May not work well
2. Use Unique Text Snippets
✅ Good: Specific, unique phrases
chunk_text = "DOM-based positioning ensures accuracy"
❌ Bad: Common words
chunk_text = "the system" # Too common, might match wrong location
3. Cache Aggressively
import hashlib
from pathlib import Path

def get_cached_image(file, text):
    # Create cache key
    cache_key = hashlib.md5(f"{file}:{text}".encode()).hexdigest()
    cache_path = f"cache/{cache_key}.png"

    # Return cached if exists
    if Path(cache_path).exists():
        return cache_path

    # Generate new image
    return extractor.extract_with_highlight(file, text, cache_path)
Use Cases Beyond RAG
While we built this for RAG systems, it's useful for:
1. Technical Documentation
Create visual tutorials showing exactly where to find features:
# Generate images for each feature in your docs
features = [
    "authentication setup",
    "API key configuration",
    "rate limiting"
]

for feature in features:
    extractor.extract_with_highlight(
        "docs/getting-started.md",
        feature,
        f"tutorial_{feature.replace(' ', '_')}.png"
    )
2. Code Review Comments
Highlight specific sections in markdown code reviews:
# Show reviewer exactly what you're referencing
extractor.extract_with_highlight(
    "ARCHITECTURE.md",
    "The service layer handles business logic",
    "review_comment_ref.png"
)
3. Educational Content
Create annotated study materials:
# Highlight key concepts with scores
concepts = [
    ("definition of polymorphism", 1.0),
    ("example of inheritance", 0.9),
    ("interface implementation", 0.85)
]

for concept, importance in concepts:
    extractor.extract_with_highlight(
        "course_notes.md",
        concept,
        score=importance
    )
4. Report Generation
Generate visual references for reports:
# Create a report with highlighted source citations
report_sections = extract_report_data()

for section in report_sections:
    citation_img = extractor.extract_with_highlight(
        section['source_file'],
        section['quoted_text'],
        f"citations/{section['id']}.png"
    )
    add_to_report(section['id'], citation_img)
Limitations and Future Work
Current Limitations
-
Text Length: Works best with 1-50 words. Very long text (100+ words) may not highlight correctly.
-
Complex Lists: Full numbered lists with multiple items work better when split:
# Instead of highlighting all 4 items: "1. Item one\n2. Item two\n3. Item three\n4. Item four" # Highlight individual items: "Item one: description of first item" -
Browser Dependency: Requires Chrome/Chromium to be installed.
Future Enhancements
We're considering:
- Multi-highlight: Highlight multiple sections in one image
- PDF support: Generate PDFs instead of PNGs
- Custom themes: Dark mode, different color schemes
- Annotation: Add notes and arrows
- Video generation: Create video walkthroughs of documents
Getting Started
Installation
pip install markitdown-reference-image
Quick Start
from markitdown_reference_image import MarkitdownImageExtractor

extractor = MarkitdownImageExtractor()
image = extractor.extract_with_highlight(
    markdown_file="README.md",
    chunk_text="quick start guide",
    output_path="highlighted.png",
    score=0.95
)

print(f"Generated: {image}")
RAG Integration Example
Here's a minimal working RAG example:
from langchain.vectorstores import FAISS
from langchain.embeddings import OpenAIEmbeddings
from markitdown_reference_image import MarkitdownImageExtractor

# Setup
embeddings = OpenAIEmbeddings()
vectorstore = FAISS.from_documents(documents, embeddings)
extractor = MarkitdownImageExtractor()

# Query
def query_with_visuals(question):
    results = vectorstore.similarity_search_with_score(question, k=3)

    visuals = []
    for doc, score in results:
        img = extractor.extract_with_highlight(
            markdown_file=doc.metadata['source'],
            chunk_text=doc.page_content[:100],
            score=score
        )
        visuals.append(img)

    return visuals

# Use it
images = query_with_visuals("How do I authenticate?")
Conclusion
RAG systems are powerful, but they can feel like black boxes to users. By adding visual context—showing exactly where information comes from—we can:
- Build trust through transparency
- Improve understanding with context
- Enhance user experience with visual clarity
- Debug better with visual feedback
The markitdown-reference-image package makes this easy. Whether you're building a RAG system, creating documentation, or generating educational content, visual source attribution helps users understand and trust your system.
Try It Yourself
# Install
pip install markitdown-reference-image

# Quick test
echo "# Hello\nThis is **important** text." > test.md
markitdown-extract test.md "important text" -o output.png -s 0.95

# View the result
open output.png  # macOS
# xdg-open output.png  # Linux
# start output.png  # Windows